Add iSCSI based storage
This section describes how to add storage from a SAN based on iSCSI.
Install open-iscsi
Open-iscsi might already be installed
sudo apt install open-iscsi lvm2 thin-provisioning-tools
We might already be using iSCSI if cinder is set up with LVM
Prepare node for cinder-volumes from iSCSI SAN
sudo iscsiadm -m session
Discover iSCSI targets on SAN
sudo iscsiadm -m discovery -t sendtargets -p <SAN_IP>

Login to the target and verify a session
sudo iscsiadm -m node -T <TARGET_IQN> -p <SAN_IP> --login
sudo iscsiadm -m session

Configure the target to automatically connect at boot
sudo iscsiadm -m node -T <TARGET_IQN> -p <SAN_IP> --op=update -n node.startup -v automatic
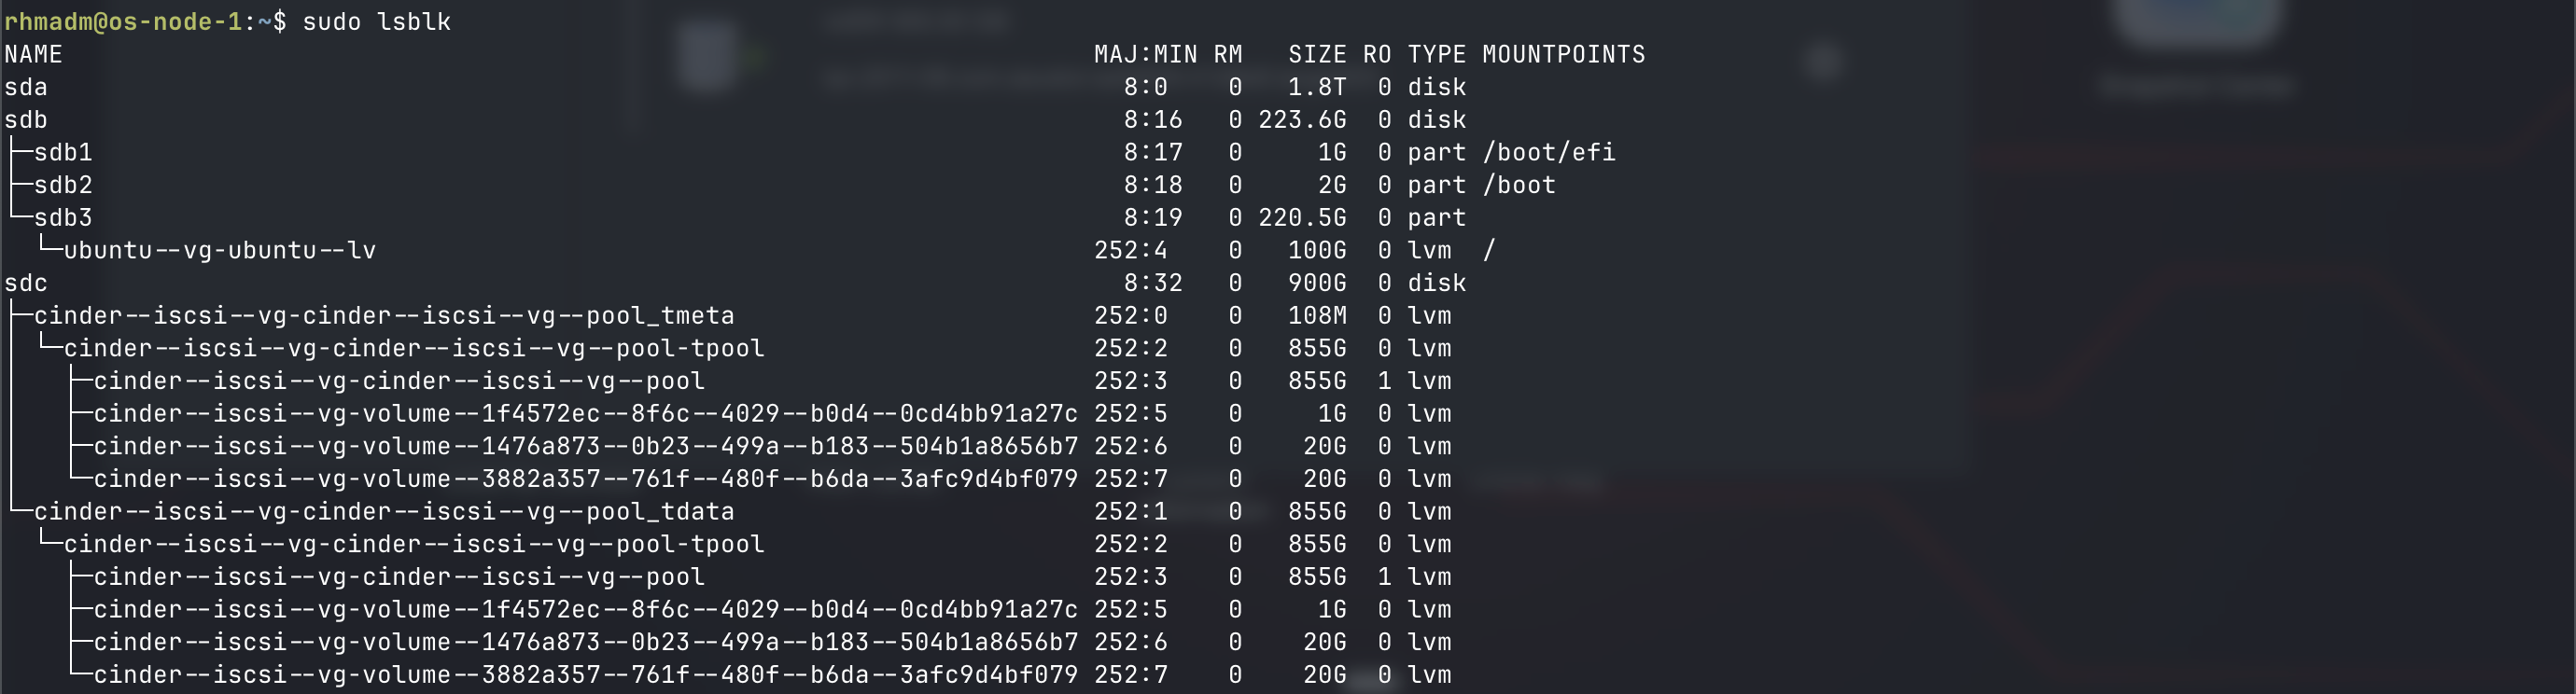
Identify disk device for iSCSI lun / volume
To create a PV on the host for the iSCSI disk we need to identify the disk
sudo iscsiadm -m session
sudo lsblk -o NAME,SIZE,HCTL,TYPE,MOUNTPOINT
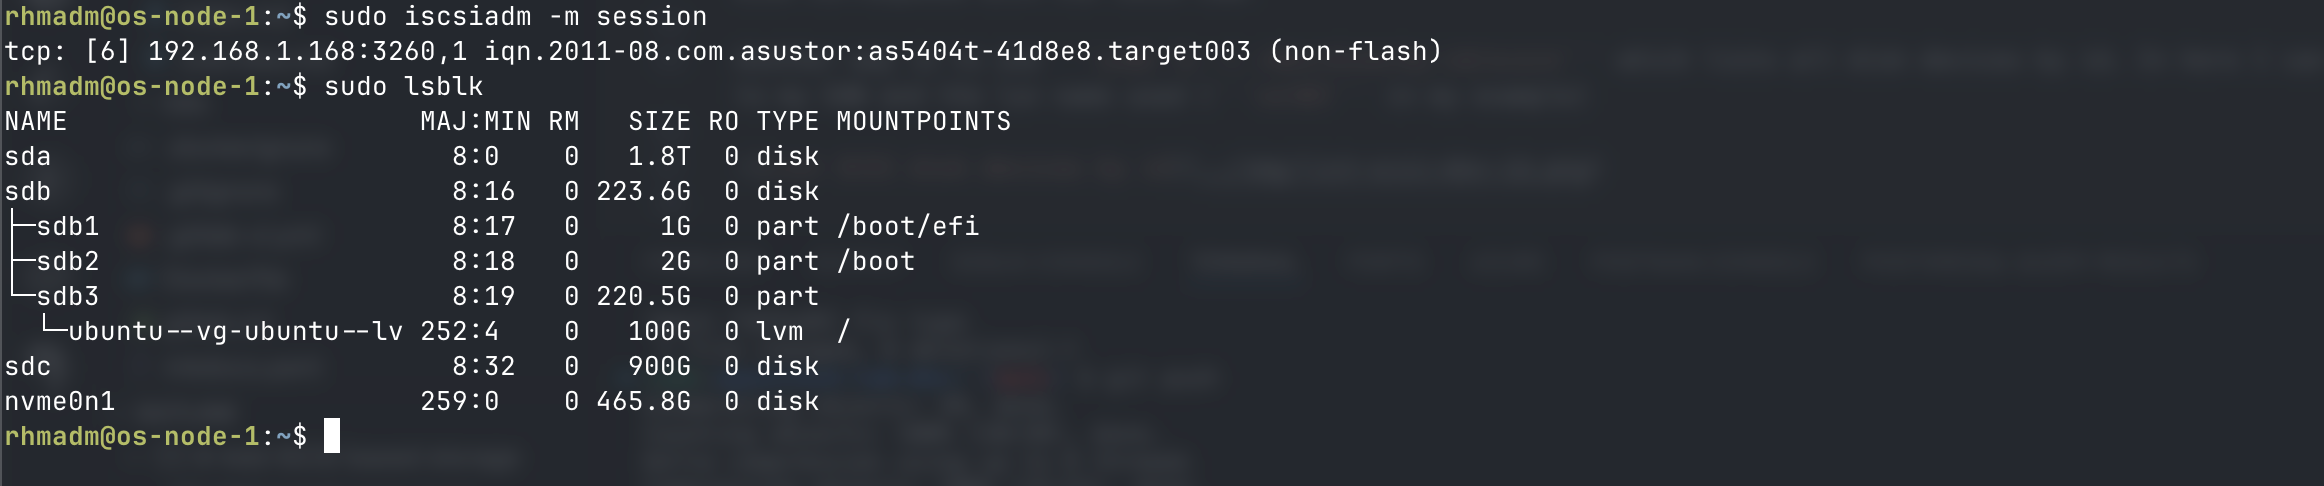
I know that the size of the disk sdc corresponds with the iSCSI LUN.
Another way is to use sudo ls -l /dev/disk/by-id/scsi* which lists all disk devices by id. In here I can search for references to my SAN and the lun name used (vol04 in my example)

Best practice is to use this id instead of the /dev/sdX name from lsblk
Update LVM config to allow by-id
If you want to use the by-id identifier and you've already configured LVM filters for /dev/sdX we'll need to update the LVM config. If not, at least add the "a/dev/disk/by-id/.*/" portion
/etc/lvm/lvm.conf
...
devices {
  filter = [ "a/sda/", "a/sdb/", "a/dev/disk/by-id/.*", "r/.*/"]
  ...
}
Create PV and VG for iSCSI volume
Now let's create a physical volume on our host from this iSCSI disk
sudo pvcreate /dev/disk/by-id/scsi-<iqn>-<identifier>
And create a volume group and add the pv
sudo vgcreate <VG_NAME> /dev/disk/by-id/scsi-<iqn>-<identifier>

Cinder configuration for iSCSI
We assume here that the cinder-volume service is installed on the storage node
[DEFAULT]
...
enabled_backends = iscsi_lvm #Additional services can be configured

[iscsi_lvm]
volume_driver = cinder.volume.drivers.lvm.LVMVolumeDriver
volume_group = cinder-iscsi-vg       # your SAN VG name
target_protocol = iscsi
target_helper = lioadm
volume_backend_name = iscsi_lvm
Restart cinder volume service
sudo systemctl restart cinder-volume.service
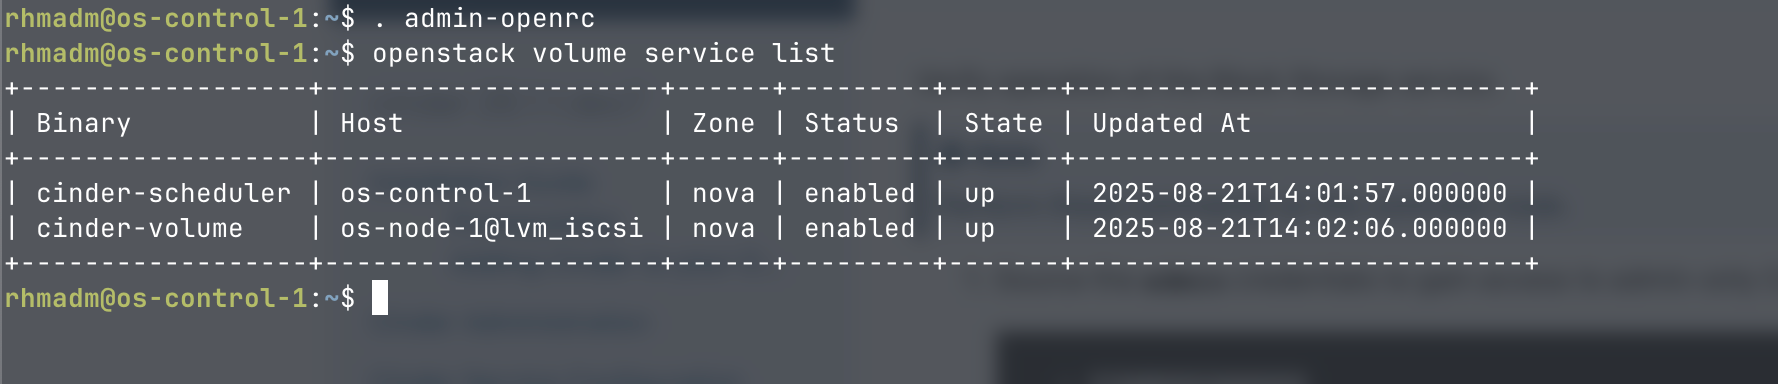
Verify that the volume service is registered
On the controller
. admin-openrc
openstack volume service list
<!--
Update cinder-scheduler config
On the controller
/etc/cinder/cinder.conf
Update enabled_backends
[DEFAULT]
...
enabled_backends = lvm,iscsi_lvm,nfs
``` -->
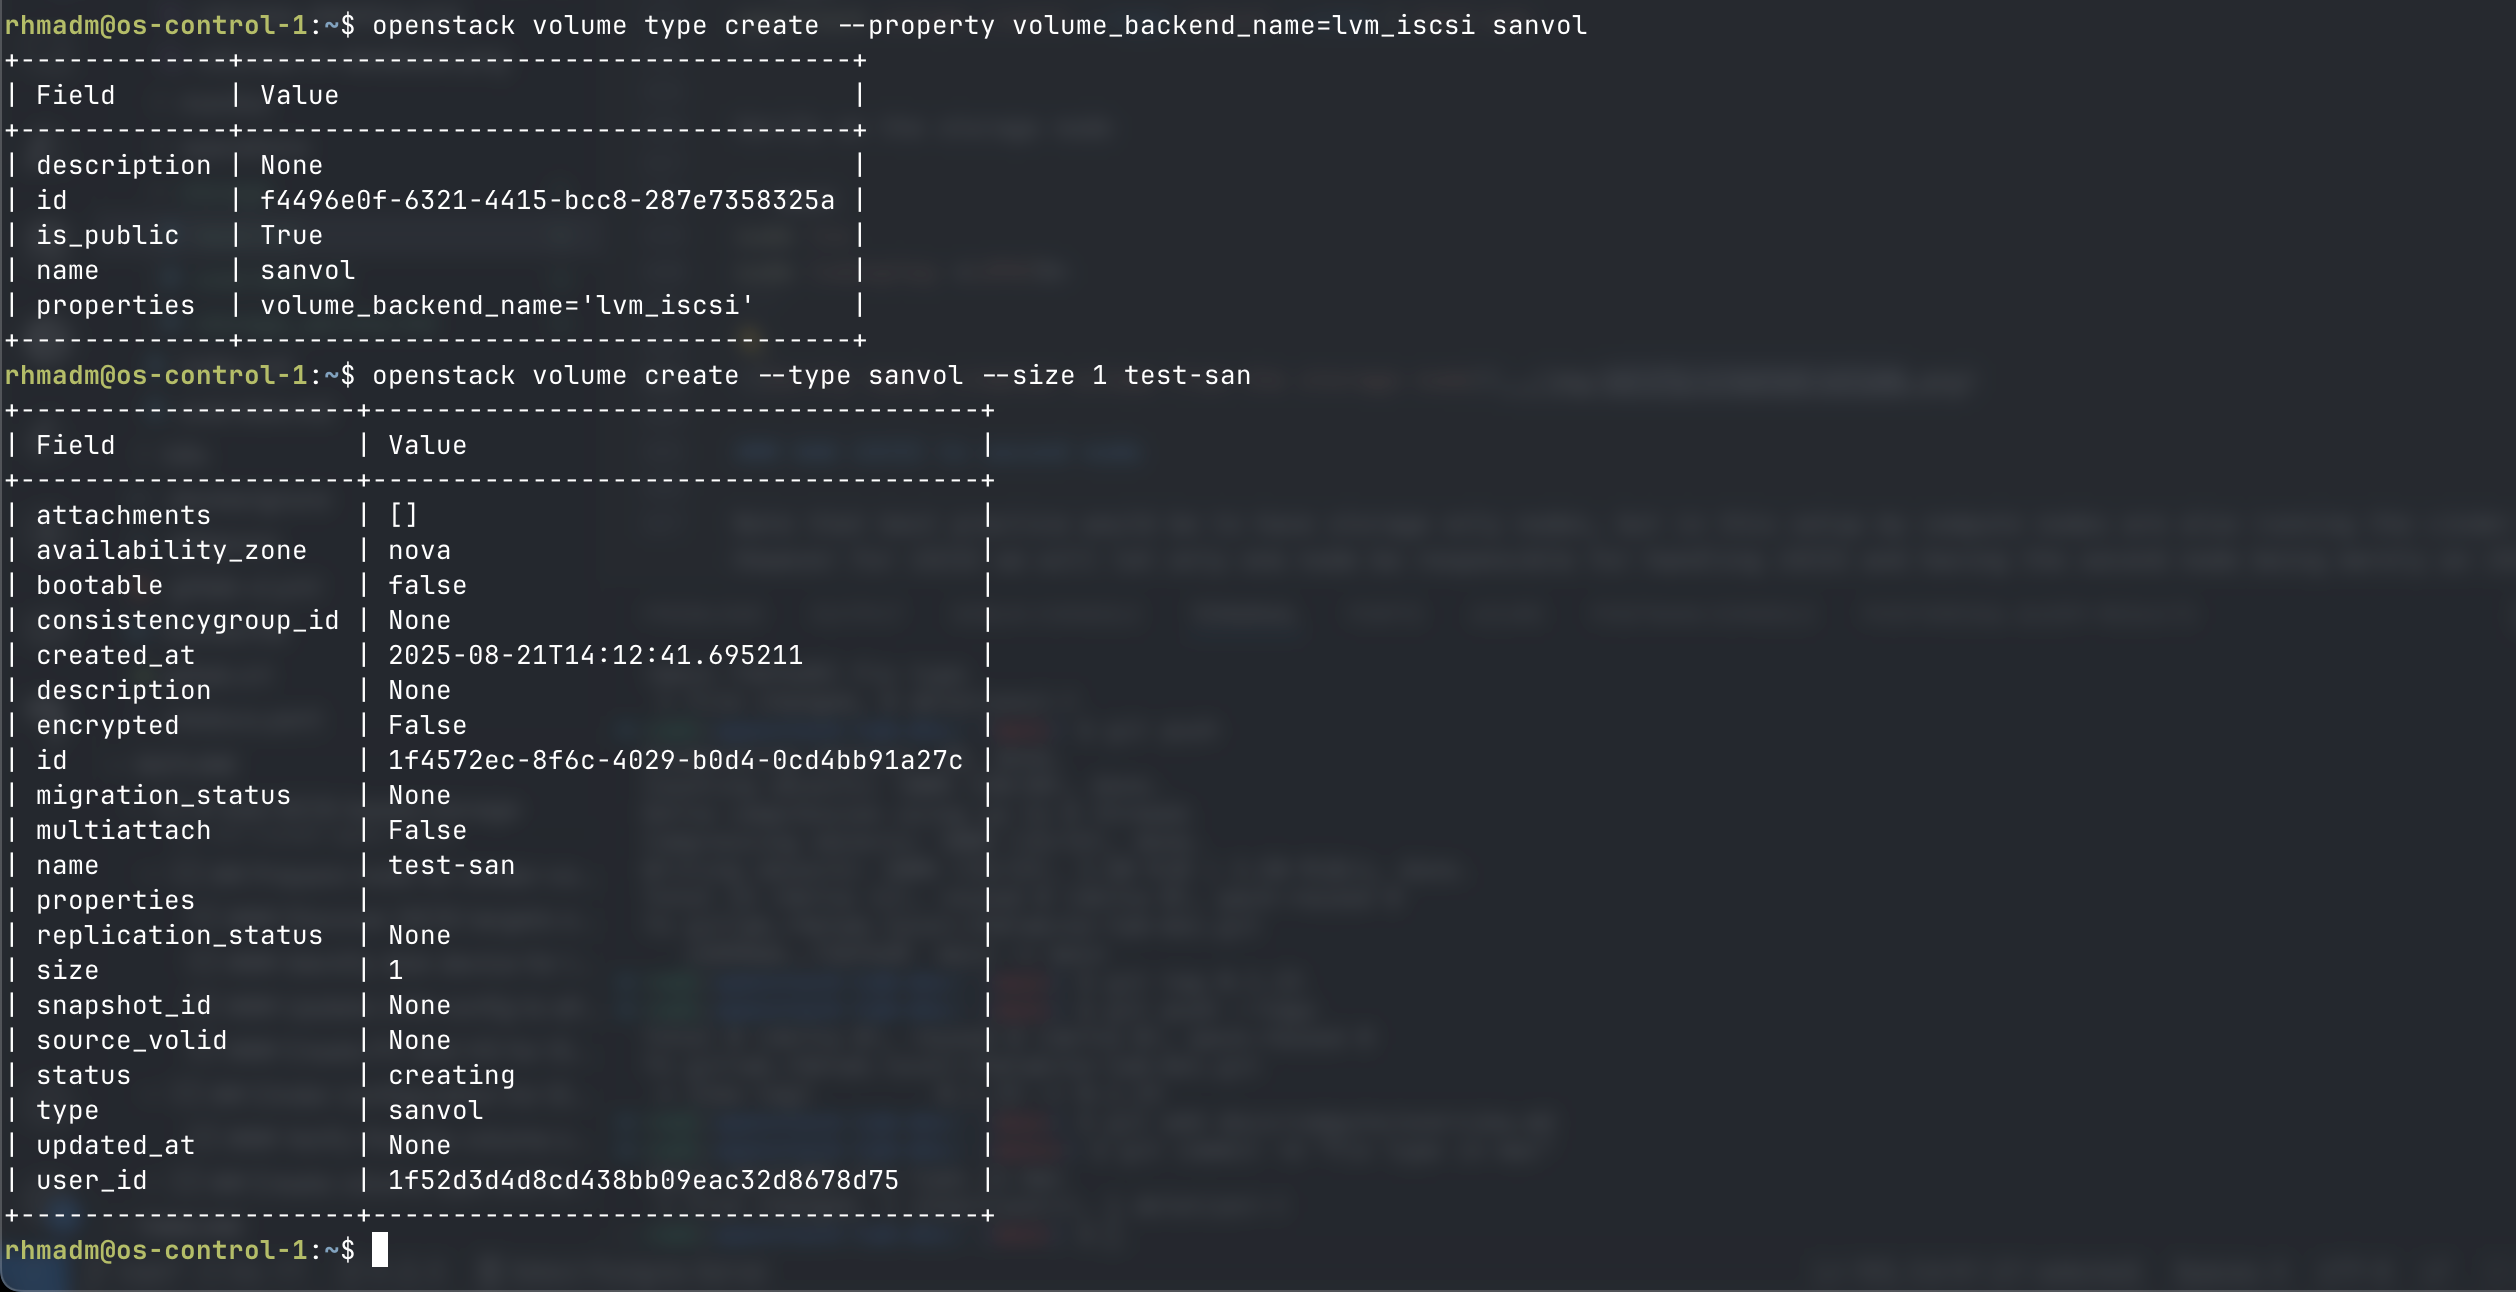
## Create volume type and test volume creation
Create a volume type named ```sanvol``` based on the backend ```lvm_iscsi```
```bash
openstack volume type create --property volume_backend_name=lvm_iscsi sanvol
Test creation of a volume
openstack volume create --type sanvol --size 1 test-san
Verify on the storage node
sudo lvs
sudo lvdisplay <LVPATH>
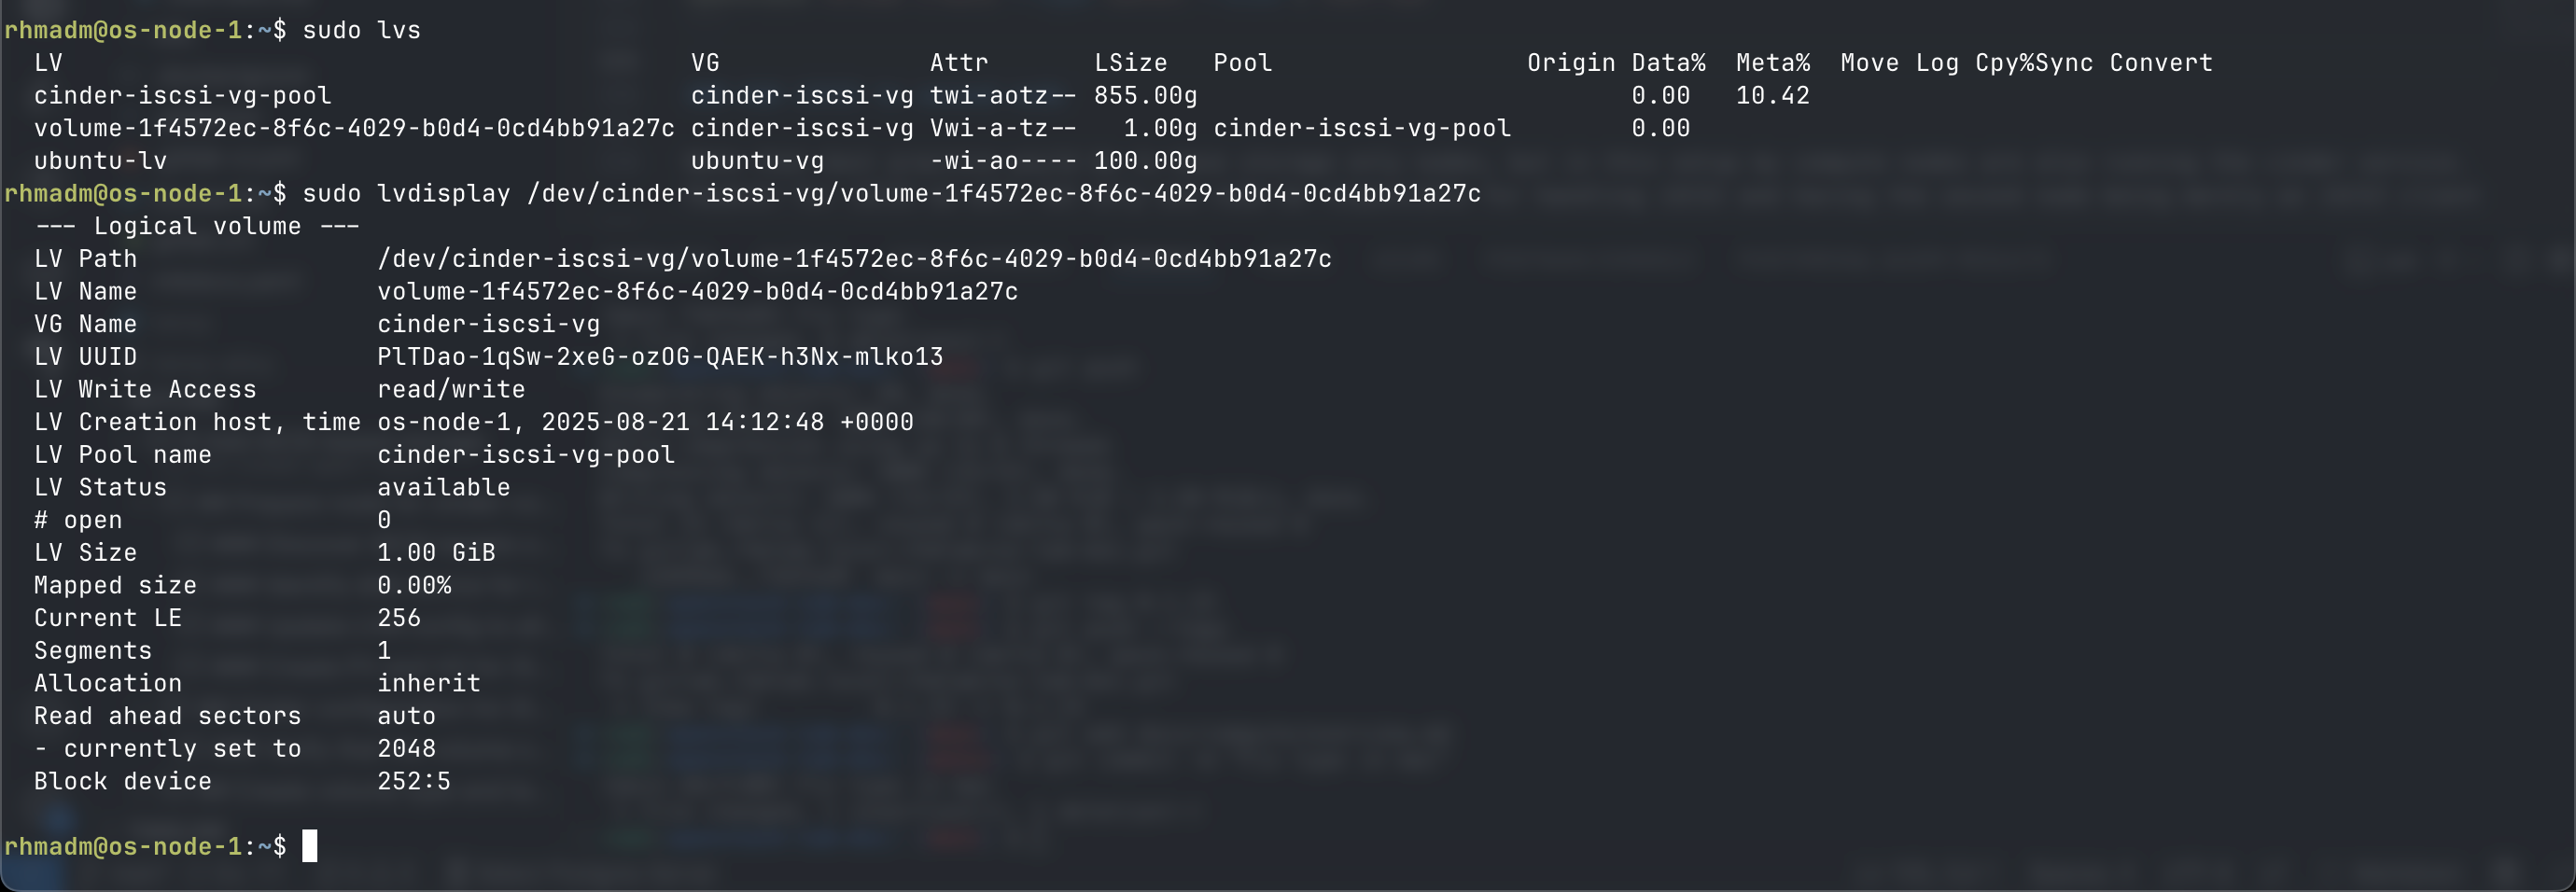
Note that the ID listed in Openstack/Cinder corresponds with the lvname
Use iSCSI on compute node
So the flow for a VM running on node 2 would be (node-1 is the storage node)
Verify iscsi is running on node 2 and that it can list the target on node 1
sudo systemctl start iscsid
sudo systemctl status iscsid
Verify that we can see target from node-1
sudo iscsiadm -m discovery -t sendtargets -p <COMPUTE-1>

Test creation of VM on iSCSI
Upload image to volume named ubu-iscsi-1
openstack volume create --size 20 --image ubuntu-24.04 --type sanvol ubu-iscsi-2
Wait for it to be available
openstack volume show ubu-iscsi-2
Create server based on this volume
openstack server create --flavor test.medium --volume ubu-iscsi-2 --nic net-id=$(openstack network list -f value -c ID | head -1) ubu-iscsi-2
lsblk view
lsblk will also list the volumes created
Add disk to iSCSI target
If an additional disk surfaces on the iSCSI target this will be listed as a disk device on the storage node
sudo lsblk
sudo ls -l /dev/disk/by-id/scsi*
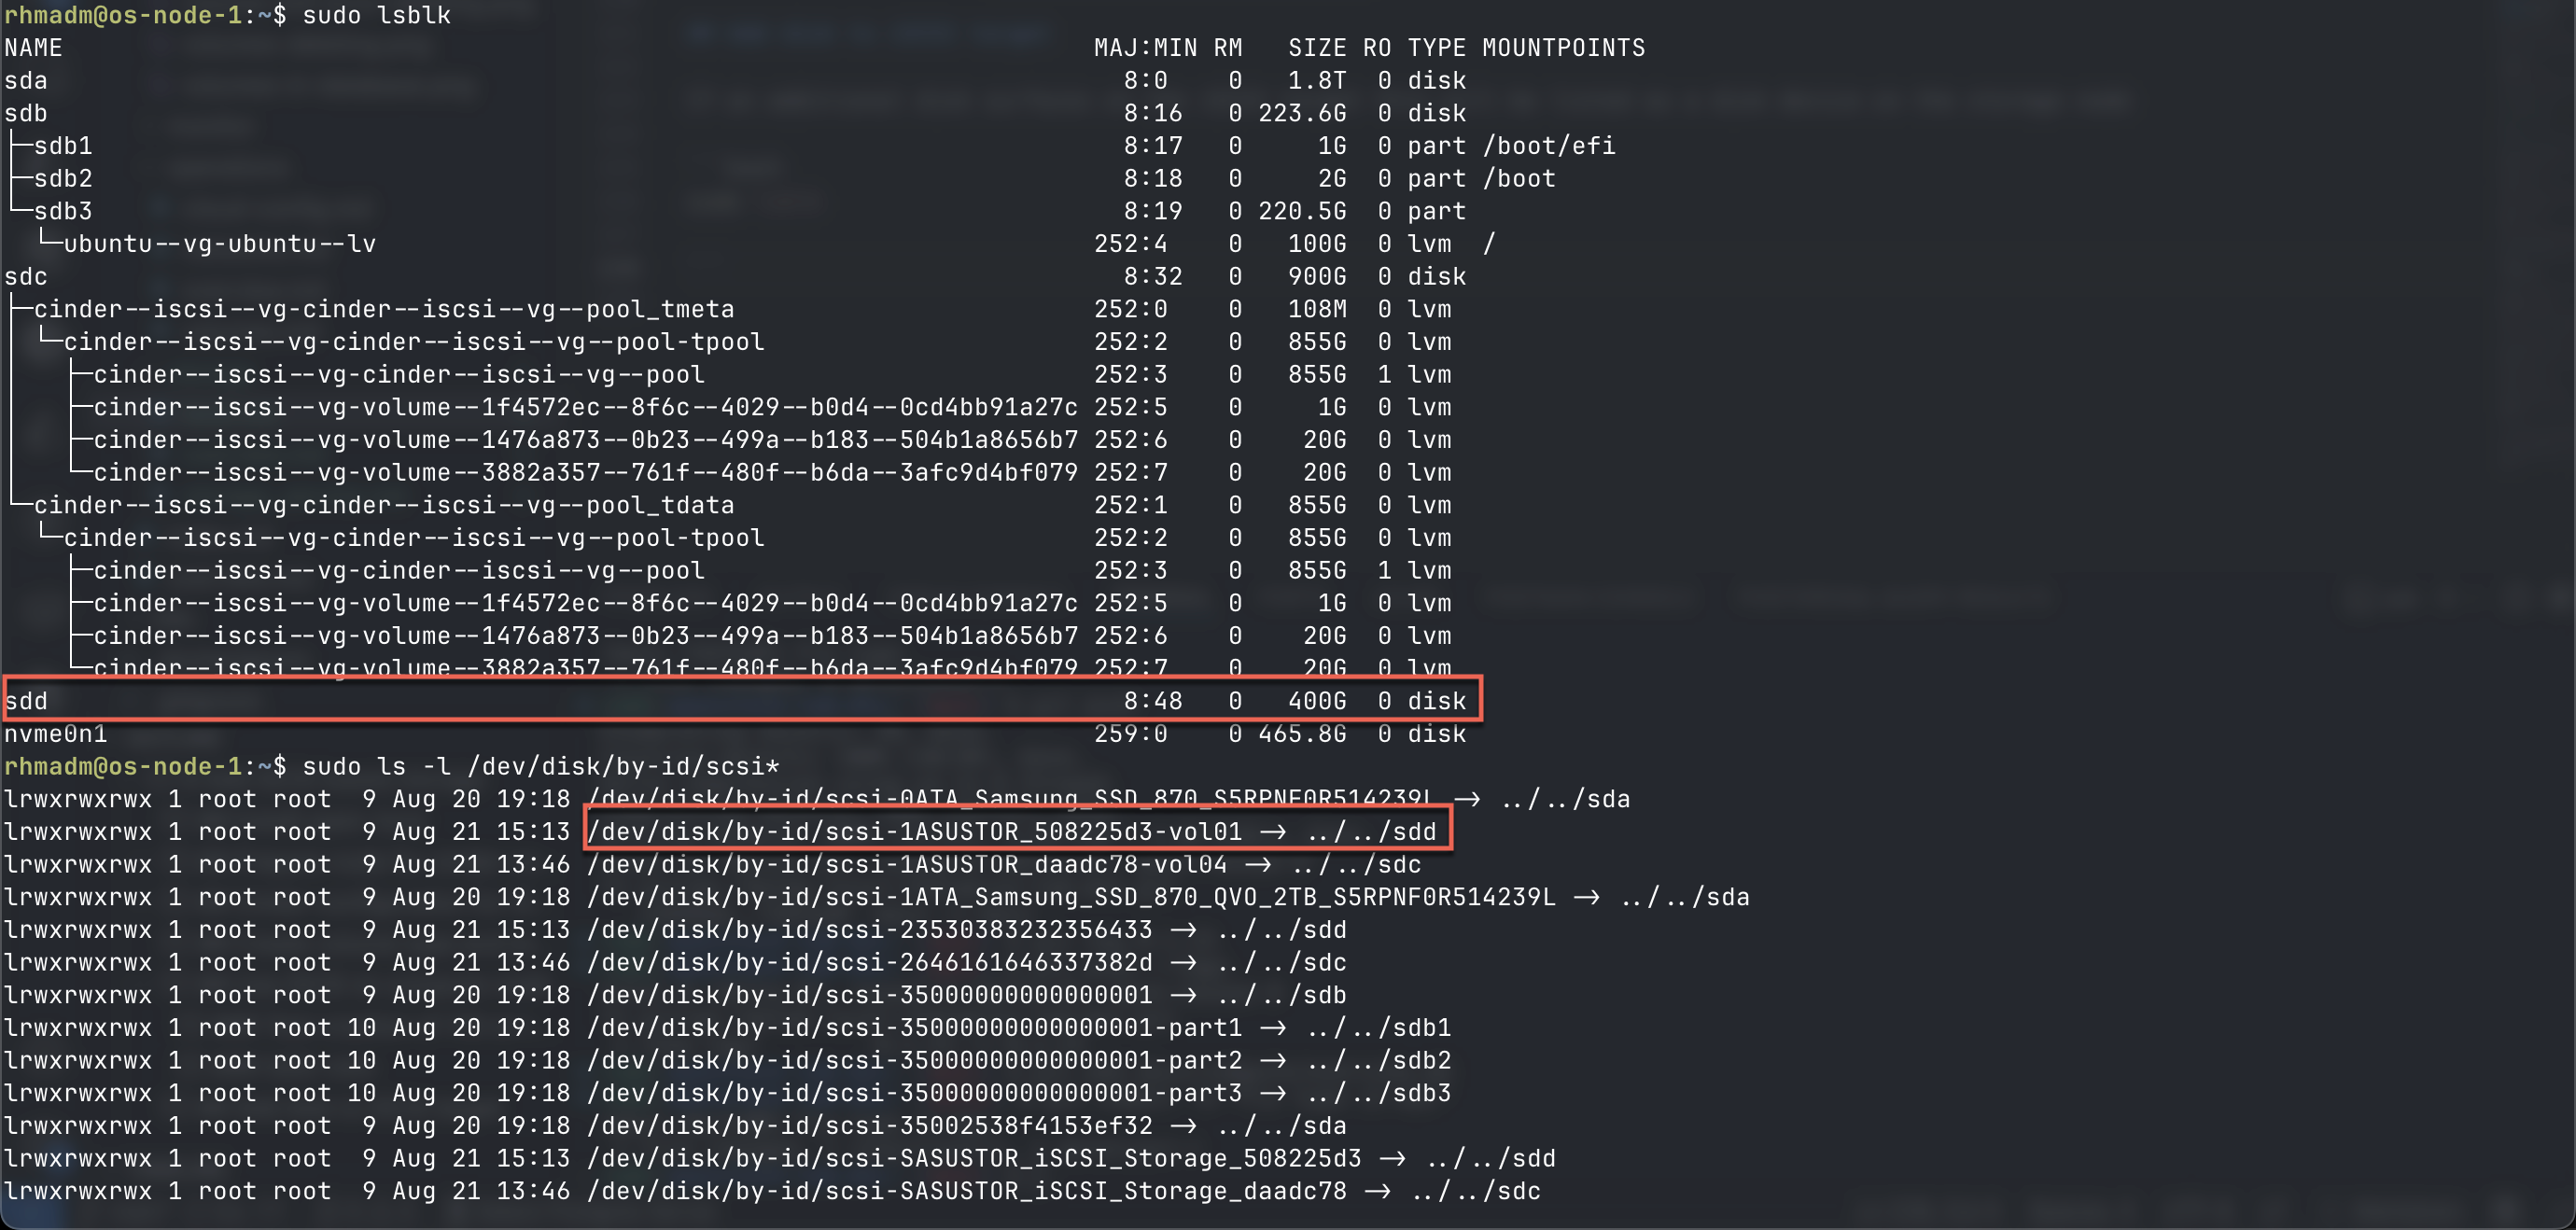
To utilize this disk we'll again have to create a pv for it and add it to a volume group
Create the pv as previously
sudo pvcreate /dev/disk/by-id/scsi<DISK>
Instead of creating a volume group we'll extend the existing one by adding the new pv
sudo pvs
sudo vgextend <VG_NAME> <PV_NAME>